Making your Alteryx Workflows Enterprise Ready: A checklist
So you’ve just completed an Alteryx workflow that is going to be used across your business. You also need to schedule it and you’ll need to catch any (potential) issues. You’re probably interested in making sure your workflow is ‘Enterprise-ready’, this means that your workflow is robust and doesn’t fall over when you roll in new data or when someone wants to make a quick change. In this blog I’ll provide a checklist of 6 points you should look at in order to successfully deploy your workflow in a business.
With distributing workflows across an enterprise I don’t necessarily mean making use of a company's gallery on an Alteryx Server but this could be part of it. In an ideal world you would want to have your workflows run on a hourly, daily or maybe weekly schedule. Which means you fully automate the process of data cleaning, parsing and storing. Ready to be analysed without manual interference. What I also mean with making your workflow enterprise ready is that the workflow will be integrated in a business process and it will be an essential part of it. Say for example, to download customer data or create spatial trade areas that are further analysed by people without an Alteryx license or by your Tableau reporting team.
Having said that, and without further ado, let's start with number one on the list.
1. Have you broken up your workflow?
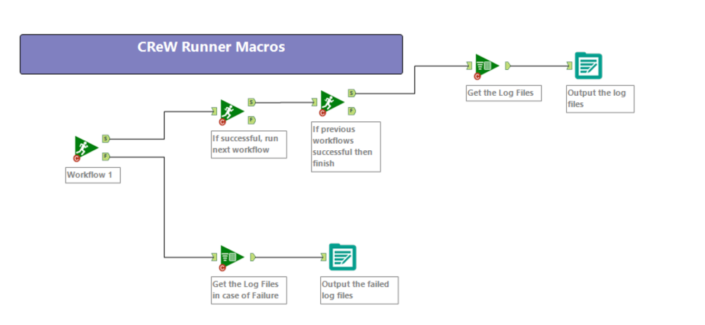
Congrats! You’ve just managed to create a beast of a workflow with about 500 tools, in which you clean some horrible looking Excel file(s), you do some advanced spatial analysis and you also added some regression analysis in it as well. Well, now it’s time to break it apart and put all these elements in separate workflows. You ideally want to handover your work to a different team, or minimise the amount of work you have to spend on it yourself. By splitting up the workflow in separate chunks you get a better overview of what the workflow is doing. On top of that it’s also easier to work on the same workflow with multiple people, each individual would take up a part of it, this being for example, the ETL part or the Spatial section. By splitting up the workflow you don’t run into version issues or people working on the same thing at the same time. Each part of the workflow's output will be the next one’s input. Also, if you want to schedule your workflow on your Alteryx Server you should make use of the Runner tools from the Crew Macro pack (see image below).
2. Are you using .yxdb files?
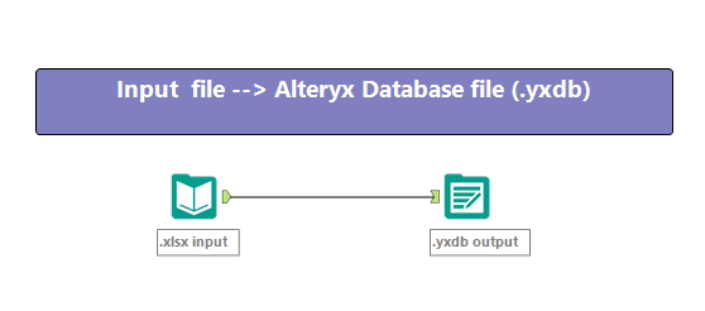
Even before you schedule your workflow you'd want to make sure you are using Alteryx Database files for speeding up the intermediate stages in your Runner workflow. This means that in the image above I use .yxdb files as the output of Workflow 1, and as the input in Workflow 2. I fairly often go to clients and they complain about the run time of their workflow. One of the first things I always do is making sure that my input file is a .yxdb file. These are significantly faster to load in Alteryx than any Excel or CSV file and they can hold any type of data Alteryx can read (and write). This also means that it can hold for example Spatial objects. A quick little tip here is to turn the 'Performance Recording' on in the workflow properties to see the difference! Your last workflow in the sequence above then outputs to a non-Alteryx file type (for example a Tableau Data Extract) or it drops your data into a database, ready to be analysed.
3. Have you properly annotated your workflow?
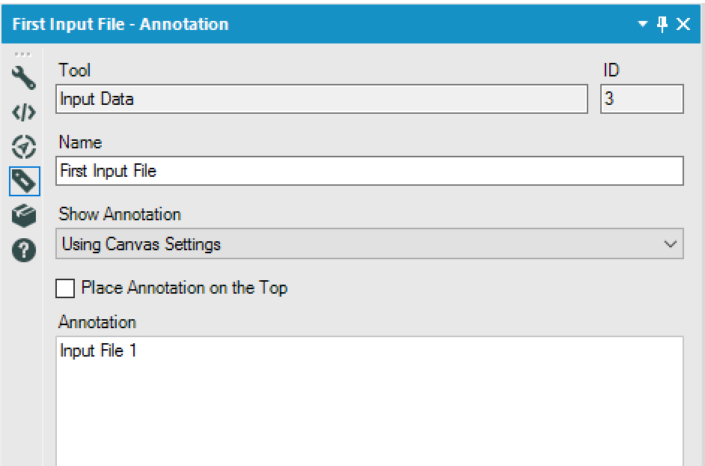
The ultimate goal of an enterprise-ready workflow is that it's fully autonomous and that it will run without any manual steps. However, you'd want to make sure that if someone else picks up your workflow, or you open it three months later, that it's still clear what the workflow is doing at what stage. This is where annotations (tool labels), comments and tool containers come in. Let's start with the first one: tool labels. Each tool in Alteryx will have a unique id (hit CTRL + F on your keyboard to see them in your workflow) and it also has a label. This means you can properly separate all your tools based on what description you give it. Handy, so you can easily find the tools you need if you do CTRL+F the next time. This also means that if there are any error messages in your workflow the tool labels show up.
This means you can go from this:
To this (a clear error message):

Another thing I use to simplify the documentation of my workflow is that I use tool containers. Sometimes to group certain tools that perform a particular process, but also to embed images. Take for example this workflow:
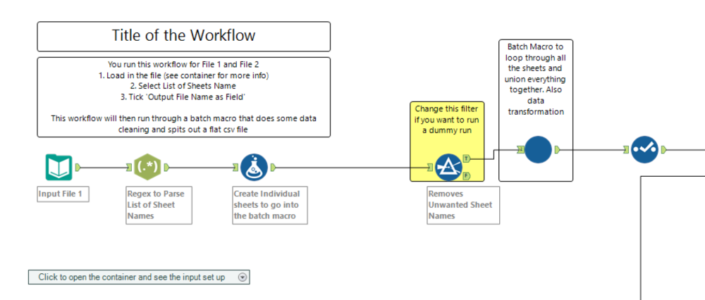
If you open this one, you are prompted with a text box that's informative and gives you clear instructions of what to do. It also tells you to open up the tool container. Which contains an embedded screenshot of the Input Data tool:

4. Did you create useful and understandable error/warning messages?
When you've used Alteryx for a while you might have noticed that the error messages aren't very clear, especially if you use the R tool or the Run Command tool. Part of enterprise production is to create meaningful messages so the end user knows what to do or change. I've applied this logic in a lot of my workflows. You have basically two tools at your disposal: the Test tool and the Message tool. I created a quick video to demonstrate the latter:
In the video I explain how you can use the Message tool to notify you when there are differences between a 'default'(or 'desired') input and the actual user input file. Very useful if you need to do a lot of data quality checks.
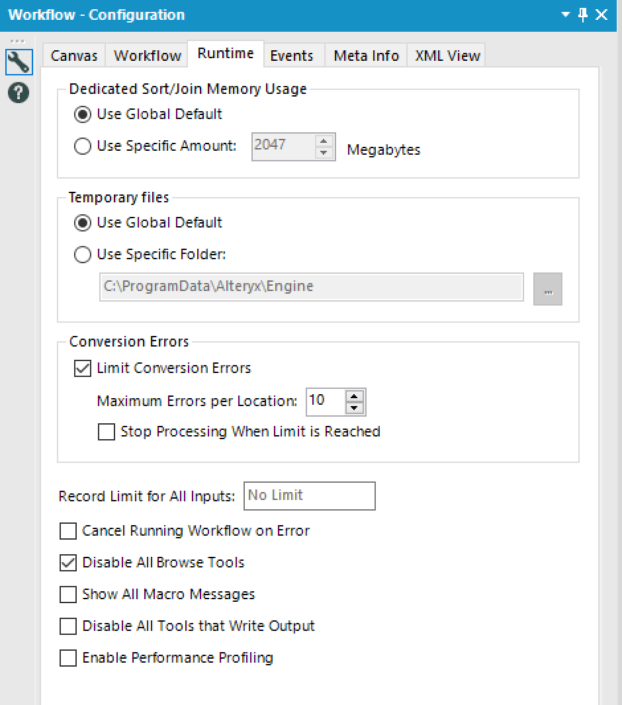
5. Did you disable your browse tools?
This is an easy one to achieve quickly. Go to the Workflow Properties and click 'Disable all browse tools'. The moment you deploy your workflow in production you don't want it to be cluttered with browse tools. Since Alteryx introduced 'Browse Everywhere' (click on the little green forward arrow in each tool), you don't necessarily need to use a browse tool to see your data. In addition, with Alteryx version 11 you can also see the total record count without even loading up all of the data in a browse tool.
6. Does your server have access to your files/database?
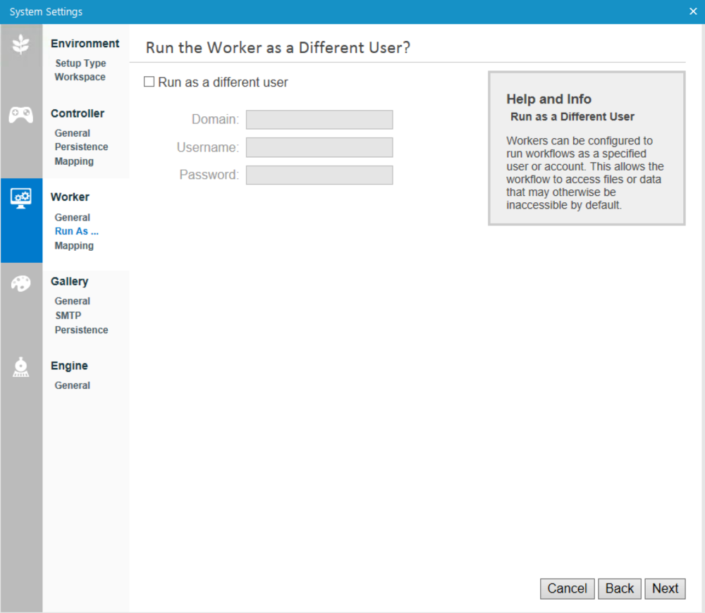
This is one for businesses that have an Alteryx Server and are relying on shared drives (One Drive for example) or databases. There are two steps involved. Firstly, you want to make sure that your Alteryx Server account (Run As) has access to these folders. From within the Designer on your Alteryx Server (or through Alteryx System Settings) you have to set this user in the System Settings. You have to tell it what account the worker should run under, this should then be the same account that has access to your shared drive or database.
Secondly, when you upload a workflow that has as input or output location a shared drive you need to give it the path where it can find these files. This is what Alteryx calls 'Workflow Dependencies'. You can find this setting under Options > Advanced Options > Workflow Dependencies. Within this menu you can find all the path references in your workflow. You need to set these paths to be UNC paths (Universal Naming Convention), whereas generally you are using mapped drives (C: or Z: drive for example). You can easily change this by clicking on 'All UNC' and it turns your mapped paths into UNC paths. This means the Alteryx Server account can see the location and read and write to this location. So not relative or absolute, but UNC paths have to be used when you publish your workflow to an Alteryx Server and you want to output to a specified location.
A final tip here is to make sure all the macros you reference in your workflow are also in a location that the server user has access to. You can also include these assets when you publish your workflow. An asset in this case will then be a Macro. However, I suggest to install your macros in a location that both you as a user can approach and also the Alteryx Server. Then there's no need to include the assets when you publish the workflow.
That wraps up this checklist of 6 points you should look at when you deploy your workflows in an enterprise setting. Keep in mind that these were only 6 points on a list that can potentially be bigger depending on your business case and the complexity of your workflow.